
Last updated:
In BaxPay, locations drive:
- Which terminals belong where
- Stock levels per product
- Tap to Pay / Register sales attribution
- What attendants are allowed to sell at
- The admin PIN for countertop readers at that site (Settings / Wi‑Fi)
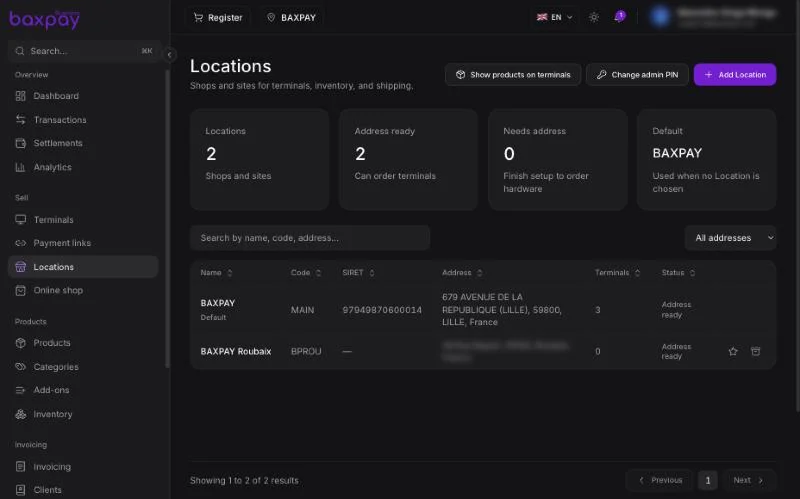
Create your first location
- Open Locations in the sidebar.
- Click Add Location.
- Enter:
- Name (e.g. “Paris Flagship”)
- Optional code (e.g.
PAR-01) - Full address (street, city, postal code, country) — required for card readers and Tap to Pay
- Optional phone / timezone / SIRET
- Save. The first location is often marked default.
BaxPay creates an admin PIN for the Location automatically (used on countertop readers for Settings / Wi‑Fi). You can change it anytime (see below).
One shop vs many shops
| Setup | How |
|---|---|
| Single shop | One location is enough. |
| Several shops | Enable multi-location under Settings → Products / features, then create more locations. |
Multi-location requires Products to be enabled. Terminal orders stay unlimited per Location.
Admin PIN (reader Settings / Wi‑Fi)
Countertop readers (S700 / S710) protect Settings (including Wi‑Fi) with an admin passcode.
- One PIN per Location — every reader assigned to that Location shares it.
- Created when you add the Location; BaxPay applies it to readers at that site when they are ready.
- Change it from Locations → Change admin PIN: select Locations, enter a new 5-digit PIN, save. Readers usually pick it up within about 10 minutes.
This is not set during device pairing on the terminal. Pairing only links the device to BaxPay; the Location PIN is already defined in Business.
On S700 / S710 with BaxPay POS as the main app, open Connectivity / Diagnostics / Appearance from the POS (More → Settings → Reader device), not by swiping left. See S700 / S710 reader settings.
Show products on terminals
From Locations, open Show products on terminals to choose which Locations (and terminals inside them) can open the in-store product catalog on POS. Selecting a Location selects every terminal there; you can then refine individual devices.
Requires Products enabled in Settings. See Products & inventory and Terminals.
Editing & archiving
- Edit name/address anytime from the location detail.
- Archive a location you no longer use (keeps history; hides it from active pickers).
- Reassign terminals before archiving if they still sell (archive is blocked while terminals are linked).
Location filter in the header
Selecting a location in the header scopes:
- Dashboard & transactions
- Product stock shown in Register / catalog
- Terminals list
- Payment links tied to that store (when applicable)
Choose All to see the whole business.
Checklist
- At least one location with a complete address
- Default location correct
- Multi-location on if you have several shops
- Admin PIN noted for staff who configure Wi‑Fi
- Each card reader assigned to the right location (Terminals)
Next: Products & inventory →