
Last updated:
- Card readers (for example S700 / S710) managed under Terminals
- Tap to Pay on a compatible phone (BaxPay Business mobile app)
Locations first
Every reader should be tied to a Location with a complete address. Tap to Pay uses the same location for sales and stock.
Also set (or note) the Location admin PIN before staff open Settings / Wi‑Fi on the reader. See Locations.
Order a reader
- Open Terminals.
- Start an order.
- Choose the location (and shipping address — often the location address).
- Pick a model from the catalog.
- Pay at checkout (price includes tax; tax and shipping are shown on the product and order).
- When your terminal arrives, follow Activate & pair below.
Activate & pair (first boot)
When BaxPay prepares your order, you get a BaxPay Terminal ID and an 8-digit activation code (on the pairing card / QR, and on Terminal details while the reader is waiting to be activated).
On the device:
- Power on and connect to the network (Wi‑Fi via reader Settings — use the Location admin PIN, or the factory passcode until your custom PIN is ready).
- Open the BaxPay POS app.
- Scan the pairing QR or enter BaxPay Terminal ID + activation code.
- Confirm the device (the hardware serial is read automatically when possible).
- Finish registration — you do not set an admin PIN on the device during pair; that PIN lives on the Location in Business.
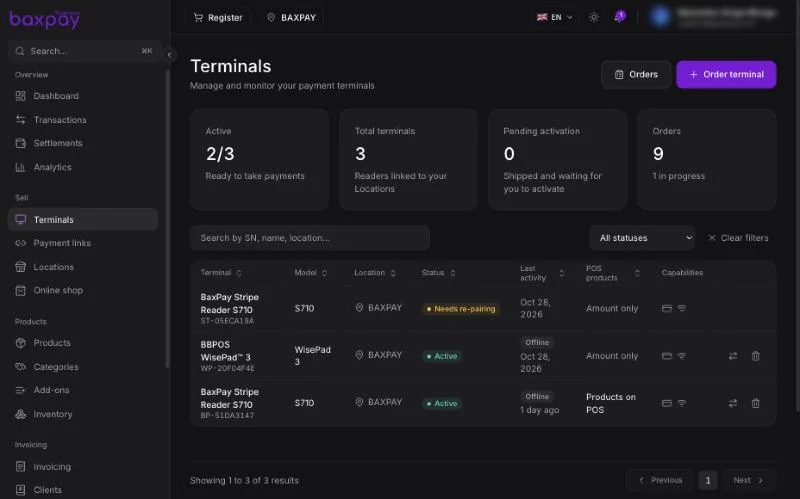
After pairing, the terminal appears as Active on the Terminals page.
Countertop readers (S700 / S710)
When BaxPay POS is the main app on the reader, swiping from the left no longer opens device settings. Staff open Connectivity, Diagnostics, and Appearance from More → Settings → Reader device. Full walkthrough: S700 / S710 reader settings.
Show products on the POS keypad
By default, hardware POS stays amount-only. To open the in-store catalog on selected devices:
- Enable Products in Settings.
- Open Locations → Show products on terminals.
- Select Locations (cascades to all terminals) and refine per terminal if needed.
- Save.
You can also toggle catalog on a single terminal from Terminals → detail.
Return a reader
You can return one or more shipped or delivered readers within 30 days of purchase (BaxPay can change the window). After that date the Return button is gone.
- From Terminals (purchased devices list) or the order page, Return items.
- Quantity and reason (defective, too many, setup too complicated, other).
- Ship the parcel to BaxPay in the original packaging, with all accessories.
- Cash refunds go out when BaxPay receives the parcel. Monthly plans: remaining instalments stop when every device on the order has been returned.
Assign / move a terminal
From Terminals detail:
- Reassign to another location (the Location admin PIN for Settings follows the Location)
- Rename for staff clarity (“Lane 3”)
- Unregister if decommissioned
Using a reader from Register
On web Register, if the location has readers, Terminal appears as a payment method. Staff complete the charge on the device (the dashboard shows a “ready on terminal …” prompt — it does not take the card from the browser).
On mobile Sell, Terminal lists readers for the active location the same way.
Tap to Pay (phone)
- Install BaxPay Business mobile.
- Sign in, complete plan + payment setup.
- Select a location.
- Open Sell → amount or products → Tap to Pay.
- Allow the permissions the app asks for (including NFC if needed).
- Customer taps their card or phone on yours.
Requirements: a supported phone and market, NFC on, and payment setup completed in BaxPay. On iPhone, Apple may need to approve Tap to Pay for production App Store builds.
WisePad 3 (Bluetooth card reader)
WisePad 3 is a small Bluetooth PIN reader. You take payments with BaxPay Business on your phone — not with the S700/S710 POS app, and not by pushing a payment from web Register.
Full walkthrough (pair on several phones, Android checklist, reset if stuck): WisePad 3.
Order & set up
- In Business → Terminals → Shop, order BBPOS WisePad™ 3.
- After payment, BaxPay adds the reader to your Terminals list (waiting to be activated).
- Assign it to a Location.
- The card in the box explains pairing in BaxPay Business over Bluetooth — not the QR flow used on countertop POS readers.
WisePad 3 is a mobile reader. You don't register it anywhere by serial number, order number or registration code: BaxPay registers it the first time you connect over Bluetooth in BaxPay Business.
Pair & take a payment
- Power on the WisePad (do not pair it in your phone’s system Bluetooth settings).
- Open BaxPay Business → select the Location → Sell.
- Choose WisePad / Card reader.
- Allow Location and Bluetooth when asked.
- Pick your reader from the list; confirm the 6-digit code on the phone and on the WisePad if shown.
- If a software update is required, wait for it to finish, then ask the customer to present their card on the WisePad.
- After the first successful connection, BaxPay marks the reader Active on your Terminals page.
Use WisePad / Card reader for this device. Card on terminal is only for countertop readers (S700 / S710).
You can pair the same WisePad on more than one phone in BaxPay (one payment at a time). If discovery fails: WisePad 3 — connection problems.
Till PIN on hardware POS
On the Android POS app installed on a countertop terminal, cashiers clock in with their till PIN before selling. See Team, roles & till PINs.
That till PIN is for staff login, not the Location admin PIN for reader Settings / Wi‑Fi.
POS look & feel (S700 / S710)
Customise logo, background, colours, and optional bottom navigation under Settings → Branding (Terminal / POS). See Settings & branding. Tap to Pay and WisePad on the phone do not use this home screen.