
Last updated:
Path: Settings → Workspace → Team (or /team).
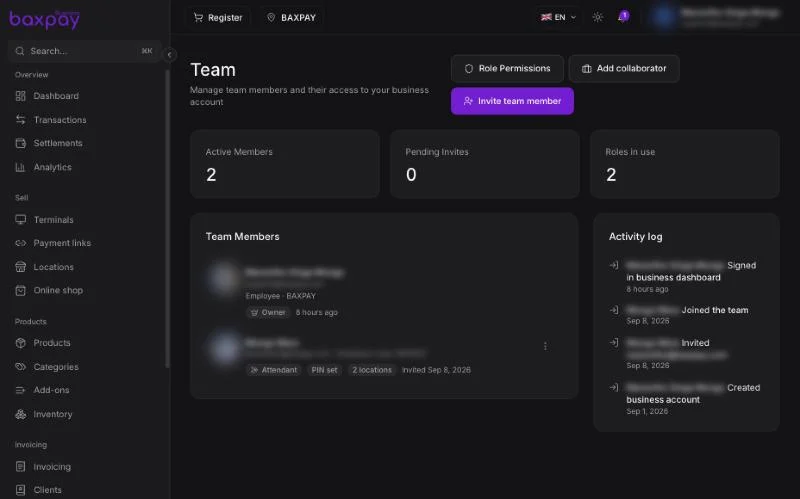
Roles explained
| Role | Dashboard access | Selling | Notes |
|---|---|---|---|
| Owner | Full (incl. billing / delete) | Yes | Account creator; sees all transactions |
| Admin | Almost full (no delete account / some billing) | Yes | Assigned locations, or all if none set |
| Manager | Ops: terminals (order), refunds, sales, payment links | Yes | Assigned locations, or all if none set; cannot add locations, settlements, plan, developers |
| Attendant | Sell-focused (caisse, products, own transactions) | Yes | Must have assigned location(s); no terminals / Settings / Team |
| Viewer | Read-only (reports, products, clients) | No | Assigned locations; no caisse / payment links |
| Collaborator | No dashboard login | No | Cards / salary advances only |
Invite a team member
- Open Team and click Invite team member.
- Enter their work email.
- Choose role (Admin / Manager / Attendant / Viewer).
- For Attendants: tick at least one location.
- For Admin / Manager / Attendant: set a unique employee code (2–16 letters/digits).
- Optionally set a till PIN (4–6 digits) now (requires employee code).
- Send invite — BaxPay emails them an Accept invitation link (valid 7 days). Email language follows the business country.
Confirm dialogs appear before role changes, disable, remove, clear PIN, and location reassignment. Those actions also send a transactional email (never includes the PIN itself).
Accept the invite (invitee)
- Open the email and click Accept invitation (or open
/accept-invite?token=…). - New email: set first name, last name, and password → you are signed in.
- Existing BaxPay Business user (no owned merchant): confirm accept → sign in with your password.
- Users who already own a business cannot accept team invites (owner exclusivity). Non-owners may join multiple businesses and switch in the header.
Use Resend invite from the member menu if the email was lost or expired.
Collaborators are not invited by email (no dashboard login).
Assign locations later
Member menu → Locations → tick shops → Save (confirm first).
Attendants only see / sell at assigned locations.
Managers / admins with no assignments see all locations.
Employee code + till PIN
Clock-in on POS uses employee code + PIN. PINs may repeat; the employee code uniquely identifies the cashier within the business.
Where staff enter them
- BaxPay POS app → Clock in → employee code → PIN → start shift.
Self-service PIN (Profile)
Staff with a till PIN can open Profile (/profile), request an email OTP, then set a new PIN. They need an employee code already set by an owner/admin. Owners do not use till PINs.
Admin-managed PIN (Team)
Owners/admins can still set or clear a PIN from the member ⋮ menu (confirm + notification email; no OTP). Clearing never emails the PIN value.
Not the same as Location admin PIN
Till PINs unlock cashiers on the POS app. The Location admin PIN unlocks reader Settings / Wi‑Fi (one code per Location). Manage that under Locations → Change admin PIN — see Locations.
Per-location Require till open (owner/admin) forces terminals at that location to clock in before selling.
Multi-business (non-owners)
A user who does not own a merchant can be an ACTIVE member of several businesses. Use the account menu in the header to switch. Owners keep a single owned business and cannot join another as team.
Supermarket playbook
- Create one Location for the store.
- Assign each S710 (or lane) to that location.
- Invite each cashier as Attendant, assign the store, set employee code + PIN.
- Optionally enable Require till open on the location.
- Morning: cashier clocks in with employee code + PIN.
- They sell; stock is shared; each sale stores the operator.
- End of shift: clock out.
Collaborators & salary advances
Add collaborator creates someone for expense cards / salary advances without dashboard access. Manage advances from the Team page when that module is enabled.
Dashboard access by role
| Area | Owner | Admin | Manager | Attendant | Viewer |
|---|---|---|---|---|---|
| Transactions | All | Allowed locations | Allowed locations | Own sales in allowed locations | Allowed locations |
| Locations | Manage | Manage | View only | View assigned | View assigned |
| Terminals (view / order) | ✓ | ✓ | Order at assigned | — | — |
| Settlements / banking / cards | ✓ | ✓ | — | — | — |
| Payment links | ✓ | ✓ | ✓ | — | — |
| Caisse / sell | ✓ | ✓ | ✓ | ✓ | — |
| Team / People / Developers / live mode | ✓ | ✓ (team) | — | — | — |
| Settings (plan / linked accounts) | ✓ | ✓ | Limited (no plan / linked / developers) | — | — |
| Profile (personal + till PIN OTP) | ✓ | ✓ | ✓ | ✓ | ✓ |
| Analytics | ✓ | ✓ | ✓ | — | ✓ |
Attendants and viewers must have at least one location assigned or they correctly see empty location-scoped data.
Security tips
- Employee codes must be unique per business; PINs may repeat.
- Clear PIN and disable the account when someone leaves.
- Prefer Attendant (not Admin) for pure cashiers.
- Confirm every Team role/access change — staff receive an email.
Next: Settings & branding →